Getting Started with Planner Links (Plugin for Powerpoint)
Getting Started with Planner Links (Plugin for Powerpoint)
This plugin for Powerpoint offers an easy way to add links to your Digital Planners.
Digital Planners, planners that are shared as PDF's, usually have a table of contents or another way to navigate inside the document, that relies on links. For each shape or text in Powerpoint, you can add a link (also known as hyperlink) to specific slides or pages.
This is usually done by adding a hidden shape on top of the visible shape, because of the side effects of adding links directly to shapes with text (only the text is clickable).
Planner Links offers a transparent (pun intended) way to manage the invisible links, in three steps:
- Add one or more tags to the slides that need to be linked to (the link targets)
- Select tags to add to the shapes that can be clicked,
- Generate the links for the document (or for a single slide).
If you haven't yet installed the plugin, you need to do that first. You can find a tutorial here. (Planner Links is installed with the download called Easy Journals).
Open the plugin panel, then follow the steps below.
Add Link Targets
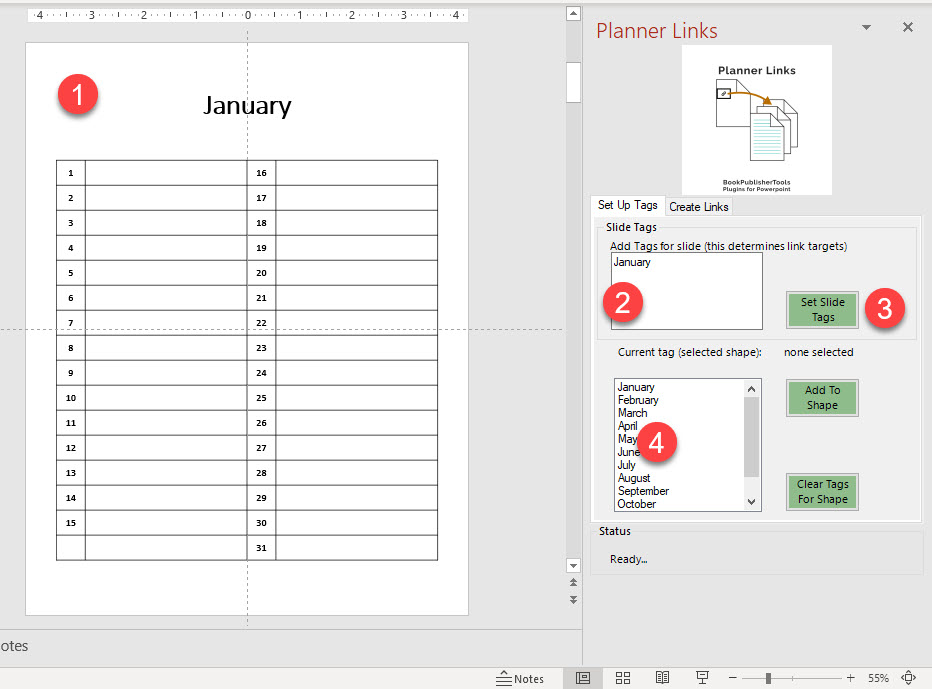
To add tags to a slide, select the slide in Powerpoint (1). This wil automatically display the active tags for that slide (2). There can be more than one tag for each slide: For example, the first slide for a calendar could have tags "Calendar" and "January", while the second slide only has the tag "February".
After typing the new or changed tags in box (2), click the "Set Slide Tags" button (3). Automatically they will be displayed as available tags in list (4).
These tags are not visible in Powerpoint, however they will be saved as meta-data inside your Powerpoint file. (Meaning: they will be available in a next working session with the Powerpoint file).
Add Tags to Shapes
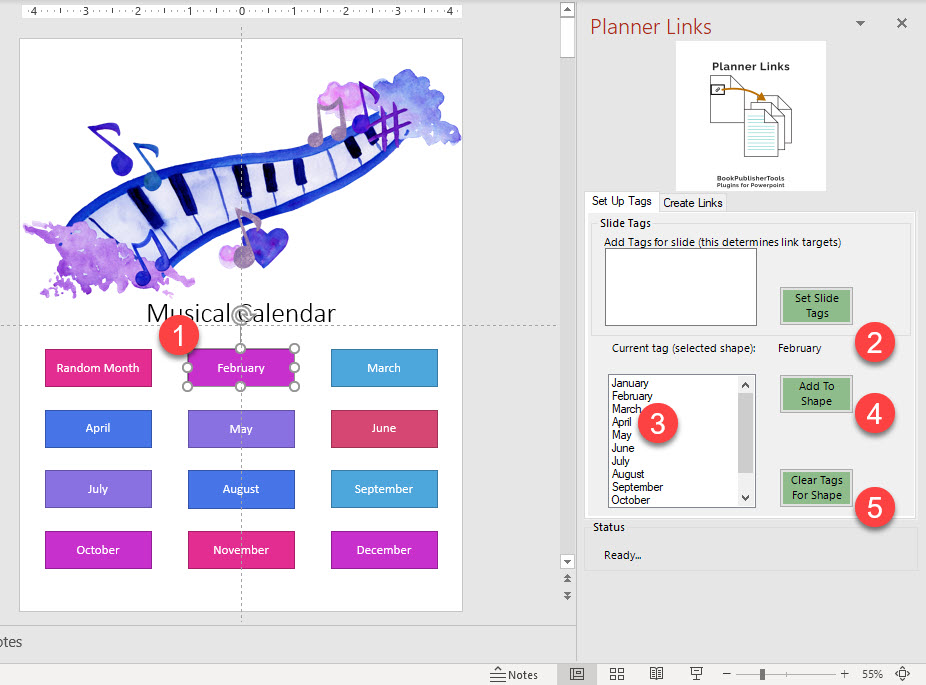
Each shape (or text, or group) can have one tag (or none). It's not possible to add more than one tag, since that would mean you would want to link to more than one slide (page) at a time.
To add or change the tag for a shape, select the shape on your slide (1). After selecting it, you'll see the current tag for that shape (2). If you want to change it, you can select a tag in the list (3) and click "Add to Shape" (4), or remove the tag from the shape (5).
You can also select more than one shape and add the same tag to all selected shapes at once.
Create Links
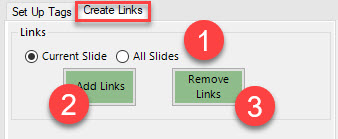
To add (create) the actual links, select the "Create Links" tab.
You can choose to add links to the current slide or to all slides in the Powerpoint file (including Master Slides) (1). To Add Links, click "Add Links" (2). This will remove old links and add new ones. To only remove existing links, click "Remove Links" (3).
Note: These options will only remove links that were created with "Planner Links", it does not handle links and invisible shapes that were added manually.
Note: It is not possible to set a Master Slide as link target (for obvious reasons). However, you can add tags to shapes on Master Slides, these will be turned into links when you click "Add Links" (with the "All Slides" option enabled).