How Do I get started with Connect the Dots (Text Version)
Puzzle Maker Pro – Connect the Dots is an interactive playground to create Connect the Dots puzzles. There are three different versions: The Lite Edition, the Manual Edition and the SVG Edition.
-
The Manual Edition has tools and options to add, insert, move and delete dots, change the style of the dots, the style of the lines and the style of the tags (numbers or text), for multiple paths (lines). These paths can be grouped together for easier overview.
-
The Lite Edition has all the features and options of the Manual Edition, but is limited to only one path.
-
The SVG Edition adds options to import SVG files and optimize the number of dots resulting from an SVG import.
In this tutorial we’ll focus on the basics – the window layout, and the tools and options to create a very simple Connect the Dots puzzle. This tutorial assumes some knowledge of Puzzle Maker Pro – Settings for output path, file size and format are explained elsewhere.
How to get Started with Puzzle Maker Pro – Connect the Dots
After choosing Connect the Dots in the Puzzle Type menu, you’ll see a window like the one below. (Details may differ slightly, because we’re continuously improving the software)
Creating a Connect the Dots puzzle consists of two steps:
-
Create the dots and paths for the puzzle
-
Change the styling and options
Lite Edition
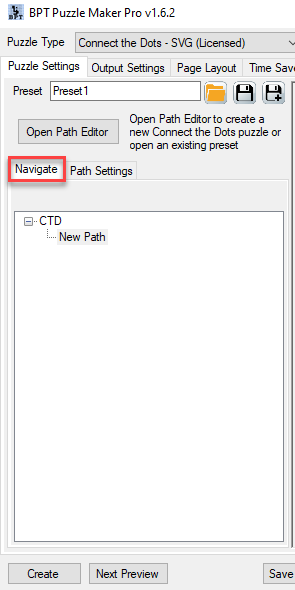
The next image is the default display for the Lite version of Connect the Dots.

-
The properties for the current path, such as line color and dot type. We’ll explain this after creating our first path.
-
The preview panel contains brief instructions for Connect the Dots, telling you to Open the Path Editor (3)
Click the “Open Path Editor” button (3) to get started.
Manual Edition and SVG Edition
The Manual Edition and SVG Edition open the window with the Navigation menu visible. When starting a new puzzle, there will only be one single path shown: "New Path".
Click the “Open Path Editor” button (3) to get started.
How to Use the Path Editor for Connect the Dots
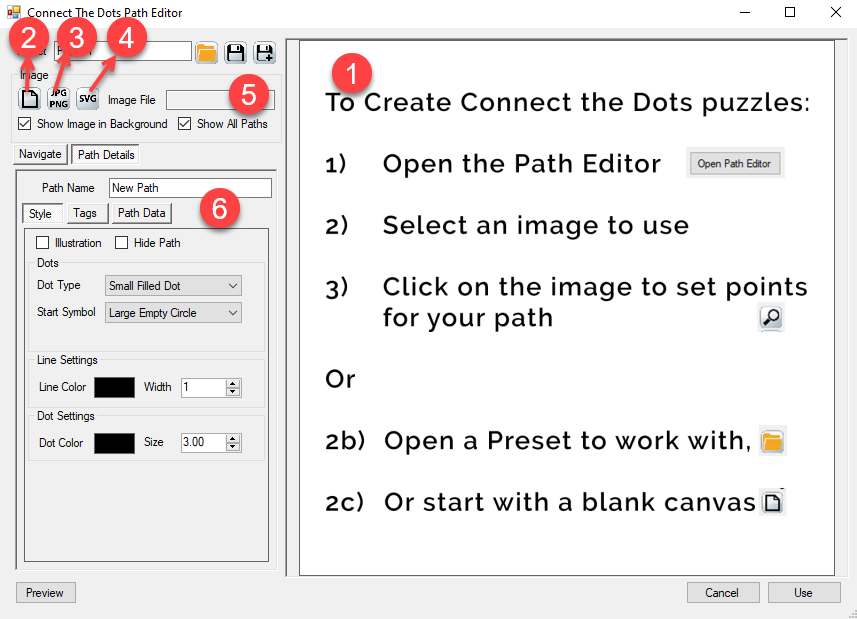
The Path Editor contains tools and options to create the different paths for your puzzle.
Some Connect the Dots puzzles only use one single path, that is: a single chain of dots numbered from 1, where the puzzler has to connect all the dots with consecutive numbers. 1 to 2, 2 to 3, and so on.
More complex Connect the Dots puzzles may have multiple paths. Puzzle Maker Pro – Connect the Dots – Manual Edition and SVG Edition support the use of multiple paths.
With the Path Editor you can:
-
Click to add dots (1). Just click on the preview panel, that contains the tutorial text. As soon as you place your first dot, the text will disappear.
-
Clear all (2): If you make mistakes, or you want to continue with a blank slate, click the “New Image” button
-
You can select an image on your computer to use as an overlay (3). That way you can add dots along the outline (or outlines) of your image. The filename of your overlay file will be shown as well (5)
-
With the SVG Edition you can also open the SVG Editor (4). This is a separate window that will display your SVG image and has options to change the number of dots.
-
At the left you can see the path settings panel (6). You can change all the path settings here, such as the name, colors, dot type, and more.
How to Add Dots to create a puzzle
By left-clicking the mouse on the panel at the right (that initially shows the tutorial text), you can add dots. The software will keep track of the order of the dots, and display lines between the dots (the path).
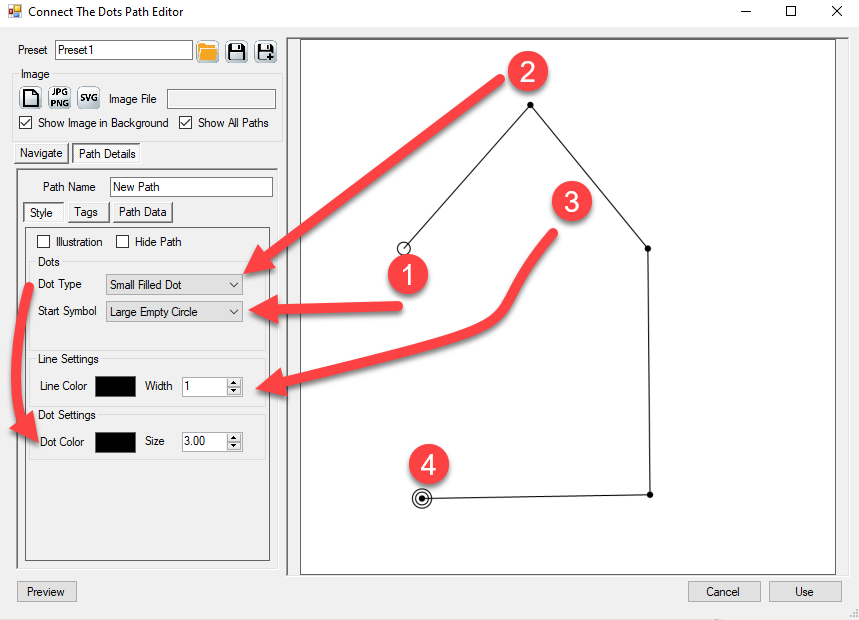
In this example we’ve created a simple path with 5 dots in the shape of a house.
-
You can always identify the start dot (1), it has a different shape and size, which you can select in the dropdown menu “Start Symbol”
After you change the settings for any of the styling options, click “Preview” (bottom left) to update the preview.
-
The shape for the regular dots (2) can be selected in the “Dot Type” dropdown menu, the color and size can also be changed using the Dot Settings options. Dot size and Line Size are calculated relative to the image size (see: Puzzle Maker Pro Basics tutorial). For an image size of 500px, the dot size will be the number of pixels (for example: the current setting “3” means 3 pixels). For an image size of 2000px (4 times as big) it will be 4*3 = 12 pixels, and so on. That way the scaling will be consistent if you use different image sizes. -
The line size and width can be set (3) -
Finally, a double circle will be displayed for the ‘current’ dot (4). This is the last dot you edit, or the dot you selected.
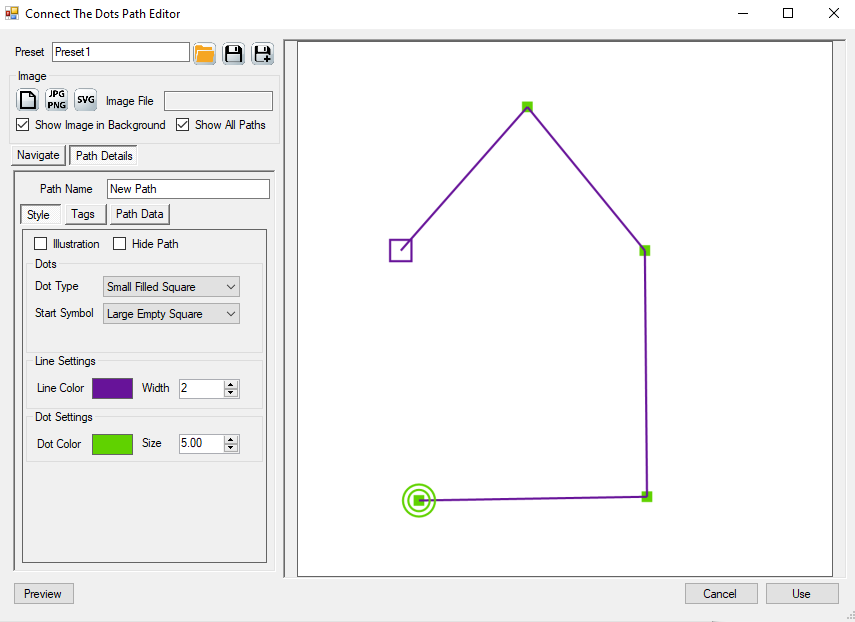
The next screenshot shows the same image with totally different styling options:
 ## How to Edit the Current Dot position
Puzzle Maker Pro - Connect the Dots is the only puzzle app where you can edit (move or delete) the individual dots in a path.
A dot can be marked as the current dot (with the double circles). That means it’s the last dot you added or clicked. The current dot is also the one that can be edited:
## How to Edit the Current Dot position
Puzzle Maker Pro - Connect the Dots is the only puzzle app where you can edit (move or delete) the individual dots in a path.
A dot can be marked as the current dot (with the double circles). That means it’s the last dot you added or clicked. The current dot is also the one that can be edited:
-
If you click anywhere on the image, the next dot will be added directly after the current dot (and before the next dot). This way you can add dots to an existing path -
You can press the Delete key (Del or Delete) on your keyboard to delete the current dot. This will only work if the mouse is positioned over the preview panel. (Otherwise other apps may not work properly) -
You can use the left, up, right and down arrows to move the dot a tiny bit in that direction -
You can use the PgUp, PgDn, Home and End keys to move the dot a bit further in that direction (Home for left, End for right) -
You can press the left mouse-button when positioned over the current dot, move the mouse and release the mouse-button. This will move the current dot to a new position. However, very small moves will be ignored (to prevent you from accidentally moving a dot when you only want to select it)
How to use the Path Data (tab)
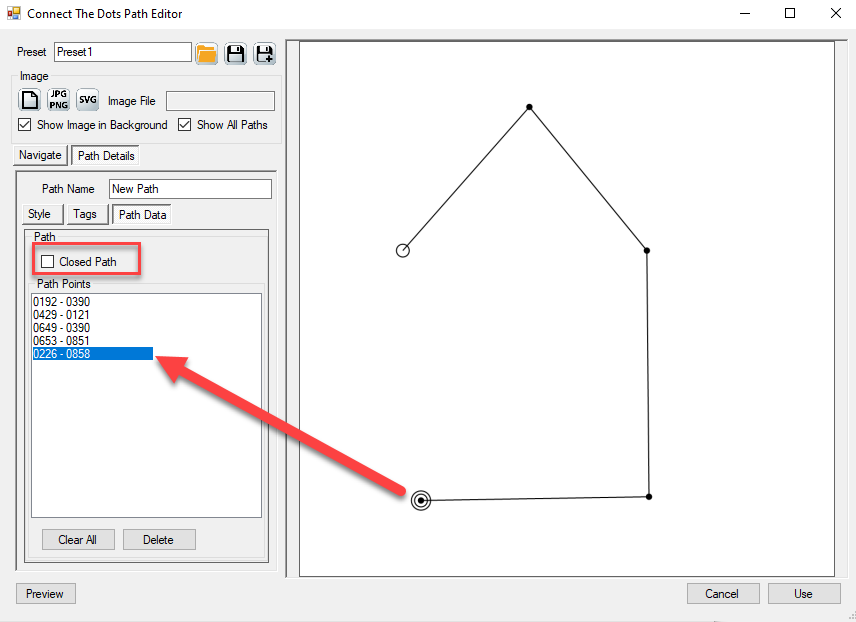
An additional way to see all the points, is the “Path Data” tab. This will show you co-ordinates for all the dots. The current dot is shown with a blue bar. You can use buttons to “Clear All” dots from the path, or to “Delete” the current dot. Usually you won’t need to use this information. You can also click other points in this list, and you’ll see a different dot getting selected in the image.
The option “Closed Path” will allow you to automatically add a line between the last and first dot in the path. In the puzzle this will result in a combined number for the first dot, shown as “1/73”
How to use the additional path settings
All the path settings are available in all Connect the Dots editions, however some path settings only make sense when you use multiple paths.
-
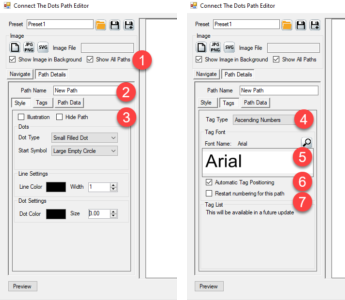
By default you’ll see only the path your editing. By clicking “Show All Paths” (1) you’ll see all the paths for the current puzzle. The other paths will have a lighter color, making it easy to focus on the current path -
You can set the name for each path, but typing the name in the Path Name box (2). Especially when you have many paths, this will help you to keep track. (You can save the path settings as a preset, to continue at a later time, or reuse the paths later. Using clear path names will help when you revisit the paths) -
For each path you can choose to hide it (meaning: it will not be shown at all) or to use it as an illustration. For an illlustration, the lines will be shown, but the dots and numbers will not be printed -
For each path you can choose a tag type (4). By default this is set to ascending numbers, other (future) options are letters or a list of numbers or letters -
You can change the font type and size for the tags (5) by clicking on the font preview button or on the small zoom icon next to it -
You can choose whether to place all the tags to the right of each dot, or at an automatic position (6). The built-in AI is continuously improving the automatic positioning -
You can choose to number continuously, or to start each path at 1 (7). This will totally depend on your puzzle.
How to use Multiple Paths in Connect the Dots
You can create Connect the Dots puzzles with one or more paths if you have the Manual Edition or the SVG Edition. On the Navigation tab you can see a hierarchically ordered list of all the paths.
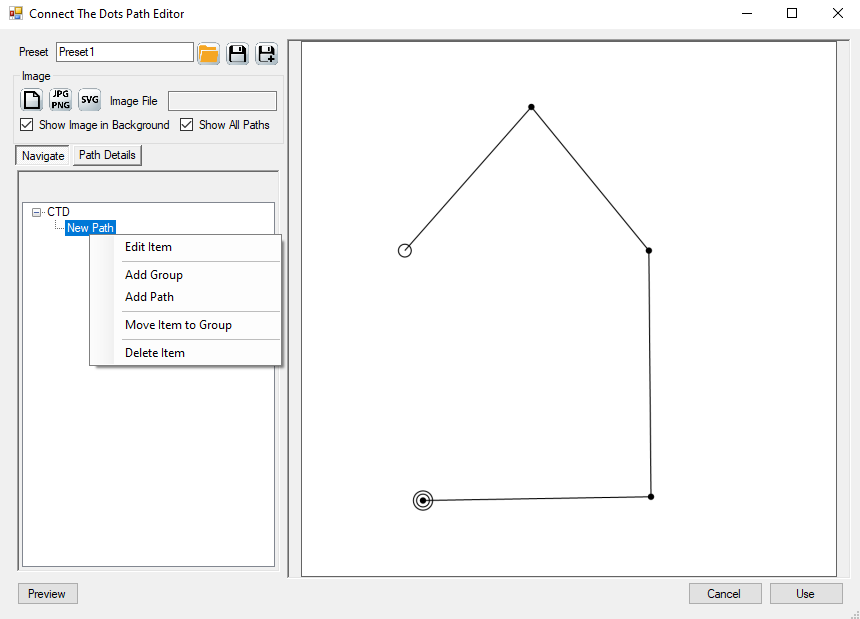
By right-clicking on the navigation panel, you’ll see a popup menu with different options:
-
“Edit Item”, this will option the “Path Details” tab -
“Add Group”, this will add a new empty group. A group is like a folder, it can hold together several paths or subgroups. -
“Add Path”, this will add a new path with its own path settings, and optionally its own numbering -
“Move Item to Group”, this will let you rearrange paths and groups. After clicking this option you have to click on the group (in the list) to select where to move the current item -
“Delete Item”, this will delete the current path or group (including all the items in the group).