How to Create Isometric Tiles with Adobe Illustrator
Creating Isometric Tiles with Adobe Illustrator
In this tutorial we'll teach you how to create an isometric tile from a square tile, so you can use it in Puzzle Maker Pro - Mazes 2D Tiles.
You can use these same techniques in other drawing programs as well, such as Photoshop, Affinity, Canva, et cetera.
Step 1: Rotate the Image

In this tutorial we'll be using separate artboards in Adobe Illustrator, so you can see the before and after images. When you create tiles yourself, it's not necessary to keep track of every step.
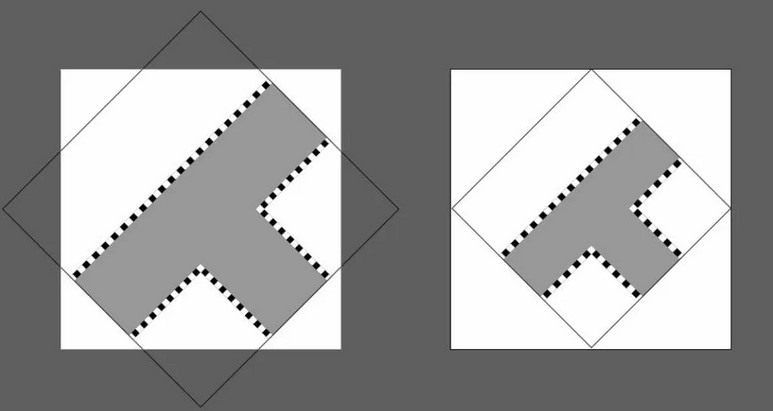
For Step One, make sure you rotate the image exactly 45 degrees clockwise. Otherwise you'll get unpredictable results in Mazes 2D Tiles.
In the examples we use a square around the tile, which is clearly visible in the rotated image. There are two reasons we do this:
- The lines make it easier to rotate and scale the image, allowing you to better see what you're doing. If you don't want these lines in the final image, you can always remove them.
- For isometric tiles, especially when you want to add depth to the tile, it can be a stylistic choice to keep these lines in the final image.
Step 2: Scale Down
In this tutorial we assume that the new tile size will be based on the size of the square tile you were using. If the square tile was 200x200 pixels, you'll want to scale the rotated image down, so the width is exactly 200 pixels. In the image you can see it's scaled down to fit the artboard.
Step 3: Scale Vertically
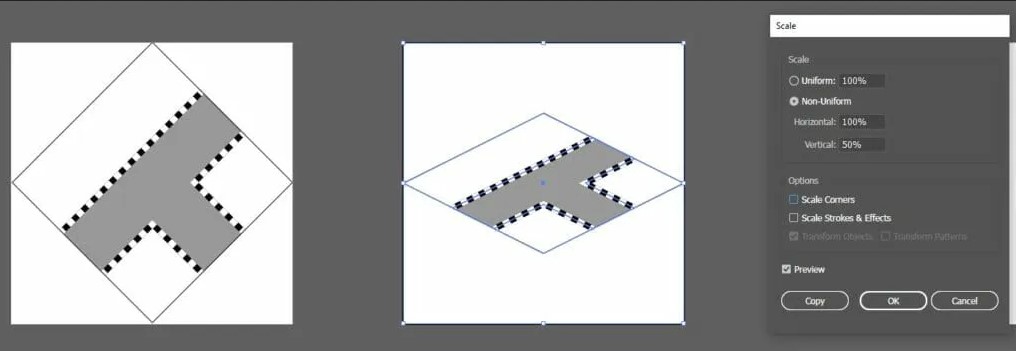
The next step is to flatten the tile. This is done by reducing the height by 50%, while keeping the width at 100% (which means there should be no change in the width). Depending on your program, you may need to unlink horizontal and vertical scaling to enable this.
You can tell from the picture that it already looks very close to isometric.
Step 4: Reposition the Tile
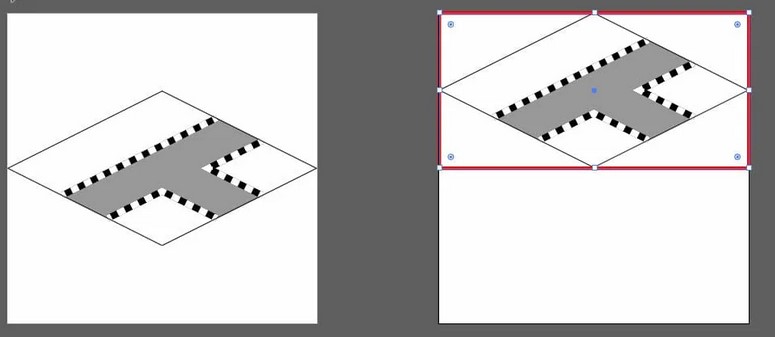
The final step is to reposition the tile. It's also possible to resize your artboard or canvas to the correct height/width ratio. You can tell in the image that the new isometric tile covers exactly 50% of the square artboard.
Now you can save the image as a .png file. Make sure that all the areas that are not part of the tile (the parts between the diamond and red rectangle) are transparent, and not white.
But wait, there's more...
Step 5 (Optional): Add Depth
The result from step 4 is already a good result, and can be used in mazes 2D Tiles. However, in some cases you may want to add some suggested depth to the tiles, for an even better result.
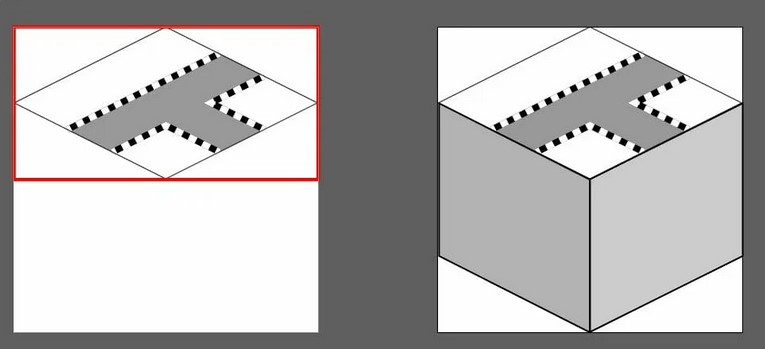
In this step you can add two slightly skewed rectangles, or even just lines, to suggest a sense of depth. The exact way to do this depends on the tools you're using. Adobe Illustrator offers advanced options to move or add individual points to a path, or to move just one side of a rectangle, to create the skewed appearance.
After adding the skewed rectangles to the image, you can give them each a different colour. In the example we've used two shades of grey, suggesting a light source that comes from the right, and a bit more shadow at the left. This increases the 3D look and feel of the tile.
There are many styles and options here:
- The example shows a 3D cube, used in games like minecraft. It is completely up to you to choose how much depth you want to add. You could go from a thin line, to as long as a cube or even longer.
In the example, the top layer stops at the edges. It's also possible to copy those colours to the top 5% or top 10% of the depth. In a colour maze, you could make it look like the top is grass, the top 5% of the depth would also be grass, and below that could be brown for dirt.
More tutorials for mazes 2D Tiles
- Getting Started with Mazes 2D Tiles for the basics on how to use the Mazes 2D Tiles software.
- Or if you want to continue with Isometric Mazes, How to create Isometric Mazes with Mazes 2D Tiles
- Or you can check out our youtube playlist for Mazes 2D Tiles