Mazes 2D Tiles - Tile format and naming conventions
The most complex and most fun part of Mazes 2D Tiles is creating your own tiles. You can use the tiles that are supplied, or buy tiles on the internet, but you can also create your own tiles. With your own tileset you can create truly unique puzzles.
In this tutorial we'll desribe how to create the tiles for square and isometric mazes, with and without the Tile Multiplier Add-On.
Creating Square Tiles for Mazes 2D Tiles
Tiles for Mazes 2D Tiles have to be saved in a .png format.
Naming conventions
We've set up a simple standard, where each side of a tile gets a number. The code consists of the numbers for the sides that are connected. The name of the file (the image file for the tile) has to start with this code, followed by a dash ("-"). The dash is required to let the software know where the code ends.
For example, a tile with a corner that connects sides 1 and 2, has code 12. The filename for this image can be something like "12-top right corner.png" or "12-corner with tree.png". You can also have both names, the software will randomly pick one of them each time this type of tile is needed.
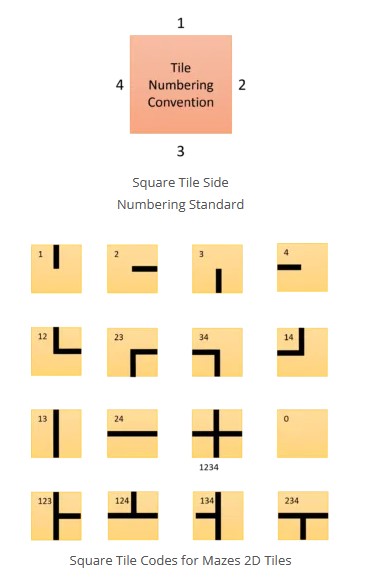
There are 16 possible codes for square mazes:
0 – optional, empty square. You can use this for embellishments, like trees, your logo, etc
1, 2, 3, 4 – Dead end
12, 23, 34, 14 – Corners
13, 24 – Straight connection
1234 – Crossing (all sides connected)
123, 124, 134, 234 – Split / three-way connection
In addition to those 16 codes, you’ll need two additional images:
s – start image (this will be printed over the start tile)
e – end image (this will be printed over the finish tile)
Image Size
The image size (or canvas size) for your tiles depends on the size of the mazes you are going to generate: If you are creating a maze of 2000 pixels wide and 2000 pixels high (almost 7″), with 10 squares per row or column, then each square will be 200 by 200 pixels. That can also be the size of the tile image.
If you’d be creating a maze of 40 by 40 on that canvas, each square would be just 50 by 50 pixels.
When the squares are printed on the canvas by Mazes 2D Tiles, they will be resized to fit.
-
If you use very large tiles, e.g. 1000×1000 pixels, the size will be reduced automatically, but the handling larger images takes a bit more time. -
If you use very small tiles, e.g. 32×32 pixels, for squares that are 200×200 pixels, the result may be unsharp.
The default tiles in Puzzle Maker Pro were created at 500×500 pixels.
Drawing the Tiles
Drawing the tiles is actually very easy. The important thing to do is make sure that the connections, at the edges of each square, are at the same place for each tile. Below is the template we used for Adobe Illustrator:
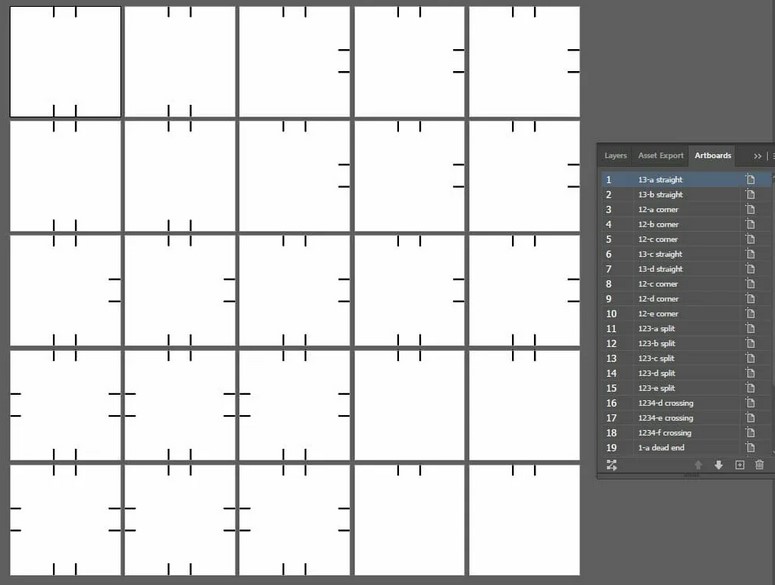
This template has several options for each tile. If you don't have the option to create multiple artobards, it's best to create a template that has all sides connected, and use that for all other tiles as well.
While we use Illustrator for the example, any editing software will do, such as Adobe Photoshop, Corel Paint, Affinity, Canva, or even the software that comes with your computer, such as MS Paint.
To summarise, you'll need 16+2 Tiles for your maze:
- 1-top.png
- 2-right.png
- 3-bottom.png
- 4-left.png
- 12-topright.png
- 23-rightbottom.png
- 34-bottomleft.png
- 14-topleft.png
- 123-toprightbottom.png
- 124-toprightleft.png
- 134-topbottomleft.png
- 234-rightbottomleft.png
- 13-topbottom.png
- 24-rightleft.png
- 1234-allsides.png
- 0-blank.png (optional)
- S-Startsymbol.png
- E-Endsymbol.png
For each of the files, the code at the start (the numbers plus the dash) have to be there. The rest of the filename can be omitted, or changed to something else if you want to. You can also create multiple tiles for the same code, for extra variation.
Creating Isometric Tiles for Mazes 2D Tiles
The standard naming convention for isometric tiles looks a lot like the square tiles: the code for each tile consists of the numbers for the sides that are connected. The tiles are just rotated 45 degrees.
1 – Top Right (instead of top)
2 – Bottom Right (instead of right)
3 – Bottom Left (instead of bottom)
4 – Top Left (instead of left)
Again, the name of the file has to start with that code, followed by a dash (“-“).
For example, a tile with a corner that connects sides 1 (top right) and 2 (bottom right) has code 12. The filename could be something like “12-simple corner.PNG”


For isometric mazes there are 16 possible codes as well:
0 – optional, empty square. You can use this for embellishments, like trees, your logo, etc
1, 2, 3, 4 – Dead end
12, 23, 34, 14 – Corners
13, 24 – Straight connection
1234 – Crossing (all sides connected)
123, 124, 134, 234 – Split / three-way connection
In addition to those 16 codes, you’ll need two additional images:
s – start image (this will be printed over the start tile)
e – end image (this will be printed over the finish tile)
(The list of files that are required for isometric mazes is identical to the list for square mazes, although the tiles look different.)
Drawing the Tiles
For Mazes 2D Tiles we follow the isometric ‘standard’ that is used by most game developers: For the basic tile, the width is twice the height. In addition to that, you can add depth to the tiles, by drawing ‘suggested’ depth below the tile.
It’s usually easiest – but not required – to start with square tiles, and then rotate and resize them. There are other options, depending on the tools you have. For example, in Photoshop you can use ‘smart objects’ to do the transformation for you (after you set it up just once).
The steps to transform a square tile into an isometric tile:
- Rotate the tile 45 degrees clockwise
- Scale the tile to fit onto the canvas – if you have a 200×200 pixel tile and rotate it, it will be approx 280 pixels wide, so scale it back to have a total width of 200 again
- Re-scale the tile – Horizontally to 100%, vertically to 50%. Immediately you’ll see the isometric look of the tile.
- You can save the tile as PNG image. If you started with a 200×200 pixel tile, the canvas should now be 200 (wide) x 100 (high).
- Optionally add additional lines and colors to suggest depth.
For an in-depth tutorial on how to do this, you can look at our tutorial on how to create isometric tiles with Adobe Illustrator, where we go into detail on the creation of isometric tiles.
Image Size
The image size of the files for isometric tiles depends on the embellishments you use:
- The size of the basic tile should have a 1:2 ratio for the height:width sizes. If the tile is 200 pixels wide, it should be 100 pixels high. (The proper working of Puzzle Maker Pro – Mazes 2D Tiles depends on this, otherwise the results will not look right)
- If you have added depth to the tile, either by adding additional lines or shading at the bottom, or by placing objects on the tile that stick out on top (e.g. towers, persons, arrows), the tile size can be larger. If you add depth suggestion at the bottom, each tile should have the same additional depth!
- Mazes 2D Tiles will use the height of the smallest tile to determine the depth of the tiles. and align the tiles according to that height
- If you have objects sticking out on top, these should be drawn over the tiles behind it. Mazes 2D Tiles will take this into account when setting up the canvas dimensions and margins