Getting Started with Puzzle Maker Pro
Introduction to Puzzle Maker Pro
Welcome to Puzzle Maker Pro - the world's best puzzle maker. We've tried our best to make the software as easy and intuitive to use as possible. However, because we want you to be able to create something unique to you, we still offer a lot of options.
In this tutorial we'll show you the basics. Your first puzzle (or even puzzle book) is just one click away.
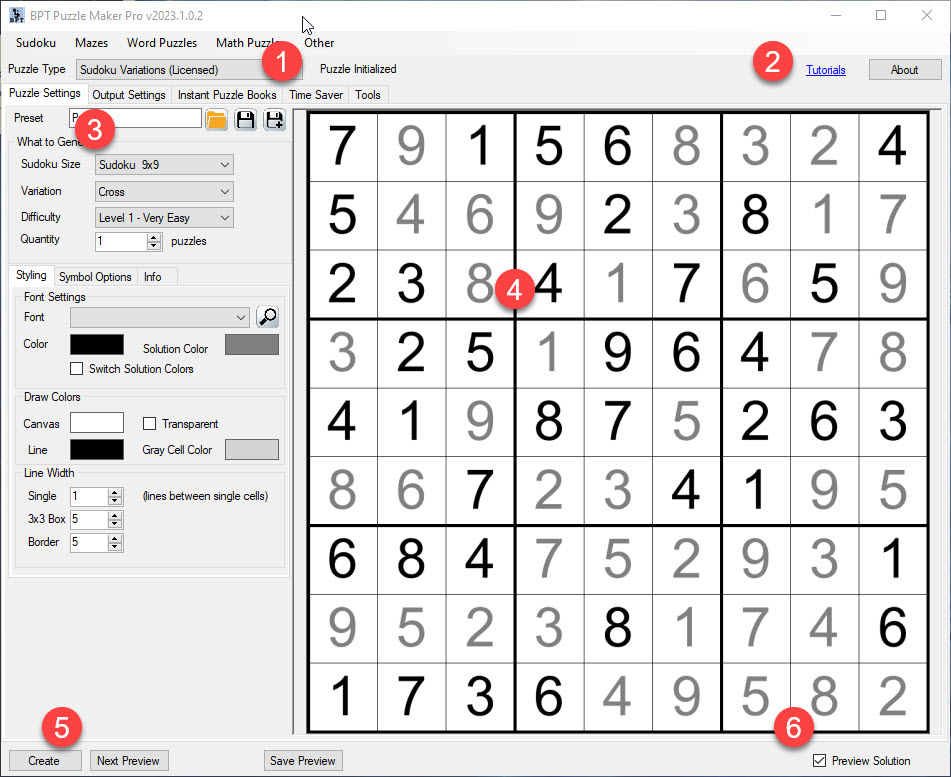
Puzzle Maker Pro - Main window.
When you start Puzzle Maker Pro, you'll see a window looking a lot like this:
It currently shows Sudoku, but if you purchased a different puzzle, it'll show that instead.
Puzzle Maker Pro is a framework for puzzle modules - some parts will be different for each puzzle, other parts are standard options available to all puzzles.
Let's start the tour:
-
Puzzle Selection: This dropdown menu will list all the available puzzle types. The ones you purchased are listed as "Licensed", others are listed as "Demo". For Demo puzzles you also get all of the options, but you won't be able to save them. The categories for puzzles are also shown above the dropdown menu. At the top of the screen, you'll see the version number Puzzle Maker Pro, in this case v2023.1.0.2. If you have support requests or other questions, it's usually helpful to mention the version. If anything goes wrong, you can contact the helpdesk at: Helpdesk.
-
Tutorial and About: The "Tutorial" button will lead you to the main tutorial website, https://help.bookpublishertools.com. Older versions (up to v1.9.2.5) have a built-in tutorial, but this has been replaced by the website. The "About" button opens the About window. You'll need this to retrieve the license for Puzzle Maker Pro. Licenses are stored on a central website, but the Puzzle Maker Pro on your computer needs to connect to the central website to find out which puzzle modules you currently own.
-
Puzzle Settings: The "Puzzle Settings" tab completely depends on the puzzle you selected. In the screenshot it's sudoku. This is where you'll find options that determine how your puzzle will be generated and its appearance. Next to "Puzzle Settings" you can see a number of other tabs. We'll discuss those later.
-
Puzzle Preview panel: This is where you'll see the preview of your puzzle or its solution. You can use the mouse-wheel to zoom in or out so you can get a closer look at details. Perhaps not necessary when you're making a sudoku, but if you're making a connect-the-dots puzzle, or a nonogram, these details will matter.
-
Create and Preview: There are two options to create your puzzles. "Create" will create and save puzzles for you. This will include the puzzle, the solution, additional files (such as a word list). If you have selected "Additional Output" such as Powerpoint or PDF, that will be created as well. "Create" will also automatically use the Time Saver, if that's selected (more about that later). "Preview" will create a new preview, that you can see in the preview panel. You can use this to set up your puzzle options and styling. For certain puzzle types, such as Mazes and Word Search, it may make sense to generate lots of previews and save the ones you want to keep, because they all look different and some may be less appealing. "Save Preview" will save the current preview (puzzle and solution file) to your computer, but it will not create any additional output.
-
Preview Solution: You can use this button to display the puzzle or the solution in the preview panel. For some puzzles, such as Mazes and Word Search, it makes sense to see the solutions, for others, e.g. Sudoku, it makes more sense to preview the puzzles.
Preview
Now go on and press preview, maybe change some of the settings, colors or numbers, and see what happens when you click preview again.
To find out where your puzzle files are saved, continue to Output Settings. For all other topics, go back to Tutorial Overview