How to create Full Page Word Search puzzles with Puzzle Maker Pro
This tutorial will show how to create Full Page Word Search puzzles with Puzzle Maker Pro.
The Tutorial applies to:
- Puzzle Maker Pro - Standard Word Search, with the Time Saver for Word Search
- Puzzle Maker Pro - Zig Zag Word Search, with the Time Saver for Word Search
Note: You can create full page word search puzzles with either Word Search module, but if you want to create entire puzzle books with the full page layout, you'll need the Time Saver Add-On.
Introduction
Full page word search puzzles are printed on a spread consisting of 2 pages. The puzzle itself is printed on one page, the word list is printed on the second page. In Puzzle Maker Pro it's easy to generate the puzzles, but it takes a little bit of math to get it right. An example of the pages in Powerpoint could look like this:
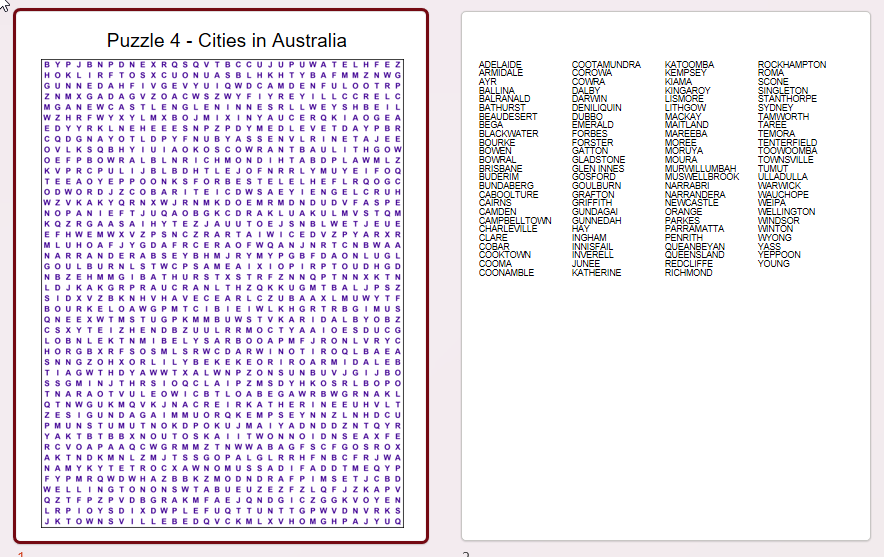
First we'll explain a bit of background, next we'll show you how to do it in Puzzle Maker Pro in several steps.
Page and Puzzle Dimensions
The entire layout depends on your page setup, the trim size and margins. The puzzle dimensions should be adjusted to this. Or the other way around, if you want a certain size for the puzzle, say 30x40 or 34x44, you may want to adjust the page settings accordingly.
As you can see on the previous image, the puzzle page consists of several parts:
- The title
- The puzzle itself
- The margins
Optionally you may want to add a page number as well.
Trim Size and Margins
There are several trim sizes that are commonly used for KDP books. For printables, you may use slightly different dimensions, corresponding to common paper sizes (Letter Size in the USA, A4 in Europe).
Let's say you want to use margins of 0.5" on each side. (This is not a requirement for Puzzle Maker Pro). This will have an impact on the printable area for each trim size:
- A trim size of 6x9" will have a printable area of 5x8"
- A trim size of 8x10" will have a printable area of 7x9"
- A trim size of 8.5x11" will have a printable area of 7.5x10"
The horizontal:vertical ratio is important, because it determines how many letters you can use horizontally and vertically. It gets slightly more complex if we add a title, but luckily you only need to do the math once.
Adding room for the title.
In Puzzle Maker Pro, the space for the title is allocated as a percentage of the total height for each puzzle. In this tutorial we have just one puzzle per page. Let's say we set the title percentage to 5%, that means:
- A trim size of 6x9", printable area 5x8", title area is 5% * 8" = 0.4". The puzzle area will be 5x7.6"
- A trim size of 8x10", printable area 7x9", title area is 5% * 9" = 0.45". The puzzle area will be 7x8.55"
- A trim size of 8.5x11", printable area 7.5x10", title area is 5% * 10" = 0.5". The puzzle area will be 7.5x9.5"
As you can see, the sizes are different, and more importantly, the ratio between horizontal and vertical is different. This means that the number of letters horizontally and vertically will be different:
- 5x7.6" has a horizontal:vertical ratio of 1:1.52, which means 1.52 letters vertically for each letter horizontally
- 7x8.55" has a horizontal:vertical ratio of 1:22, which means 1.22 letters vertically for each letter horizontally
- 7.5x9.5" has a horizontal:vertical ratio of 1:27, which means 1.27 letters vertically for each letter horizontally
For the larger trim size 8x10", the 1:1.22 ratio means a hor/vert ratio of 30x37 or 33x40 letters. For 8.5x11", the 1:1.27 ratio means a hor/vert ratio of 30x38 or 32x40 letters.
If you change the margins, you'll get slightly different calculations.
Using a fixed grid size
On the other hand, if you want to use a fixed grid size, say 30x40 or 34x44, you can also do that. Puzzle Maker Pro will resize the puzzle (image) to fit into the space that's reserved for the puzzle. This may result in a tiny bit of additional white space next to the puzzle.
Page Setup in Puzzle Maker Pro
You'll need to set up the Trim Size, the Page Layout, and the Titles.
Trim Size and Margins
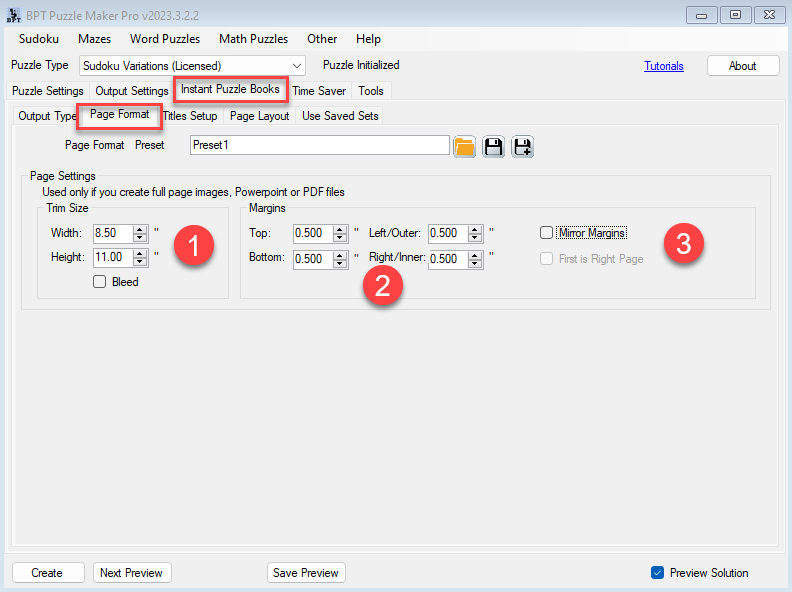
You can set the Trim size on the Instant Puzzle Books -> Page Format tab.
- Set the Trim Size, and optionally select Bleed. (Bleed will affect the printable area, Puzzle Maker Pro will take this into account)
- Set the Margins. Optionally you can use different margins for left and right pages. In that case:
- Click "Mirror Margins", and you'll also want to make sure "First is Right Page" is not enabled. This will ensure that each full page word search puzzle and its word are printed on facing pages. You'll have to add a first page later on, since KDP requires that the first page is always a 'right' page.
Page Layout
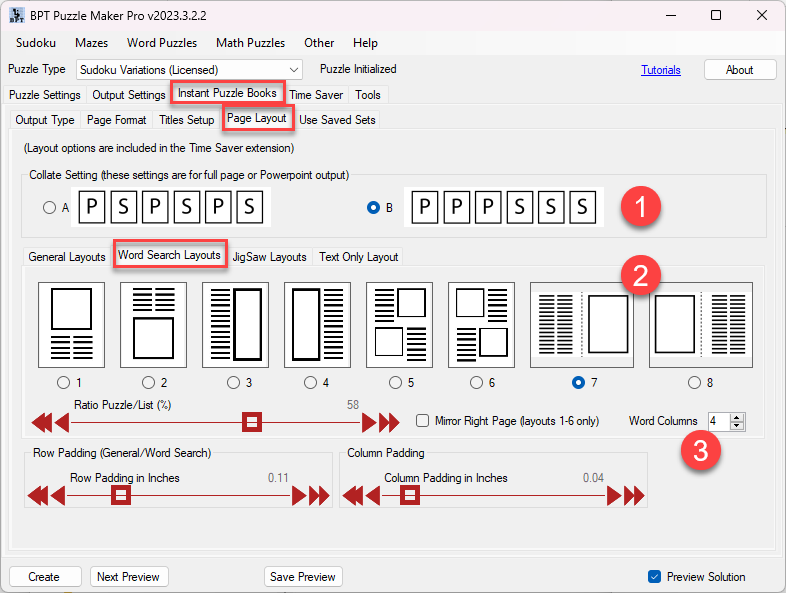
You can set the Full Page layout on the Instant Puzzle Books -> Page Layout -> Word Search Layouts tab. (This is only available with the Time Saver Add-On for Word Search).
- First, make sure to click Collate Setting "B". This will print all the puzzles first, and the solutions at the end of the book. (The solution layout can be set on the tab "General Layouts").
- Layout types 7 and 8 are used for full page word search puzzles
- You can set the number of word columns to 3 or 4.
Titles Setup
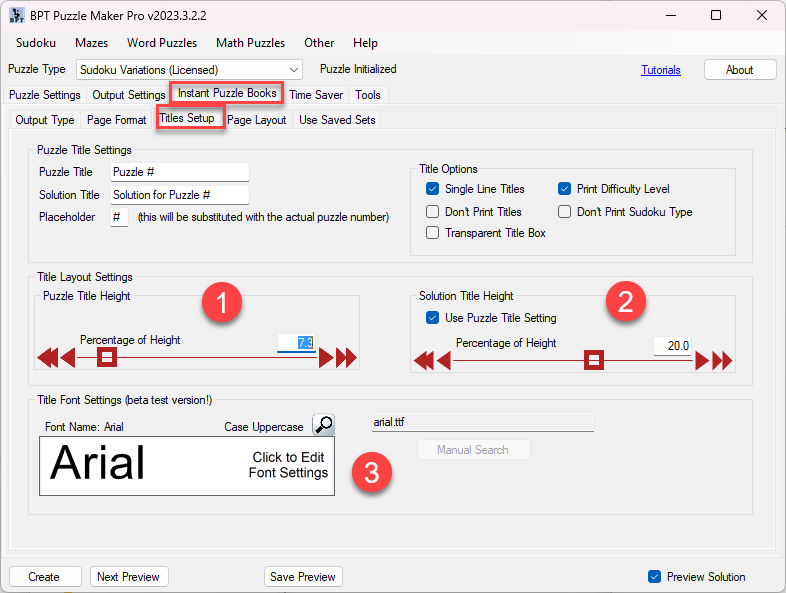
You can set the titles setup on the Instant Puzzle Books -> Titles Setup tab in the Title Layout Settings area.
- Set the "Puzzle Title Height" to the number you used in your calculations. 5-10% is enough to have a clearly printed title. The font size for the title will automatically be adjusted for the space you set.
- The solution title height is usually not important, but you can set this as well.
- If you want, you can change the font for the titles. This font does not apply to the word list.
Puzzle Setup in Puzzle Maker Pro
The previous steps were more or less the boring part. Important, but you still have nothing to show for it.
The options for Word Search are explained in other tutorials. For full page word search puzzles, you'll need to set the grid size, and have a large enough word list.

In this example we've set the grid size to 40 rows and 32 columns.
As with all modules in Puzzle Maker Pro, you can use the mouse scroll wheel on the Preview panel to zoom in (or out) and see more details of the puzzle.
Don't forget to set the right settings on the Advanced tab, such as spaces.
Creating the Puzzle Book - Time Saver
There are several techniques to create the entire puzzle book: Obviously there is the Time Saver, and some people prefer to create the puzzles manually, one by one, and then assemble them into a puzzle book using a separate module of Puzzle Maker Pro.
When you use the Time Saver, you have some additional options for the puzzle titles, and the whole process is faster. However, you'll have less control over the individual puzzles.
Make sure to click the "Use Time Saver to generate Puzzles" to make sure the Time Saver is used. When this is enabled, the "Create" button will change into "Create (TS)".
Time Saver - Main
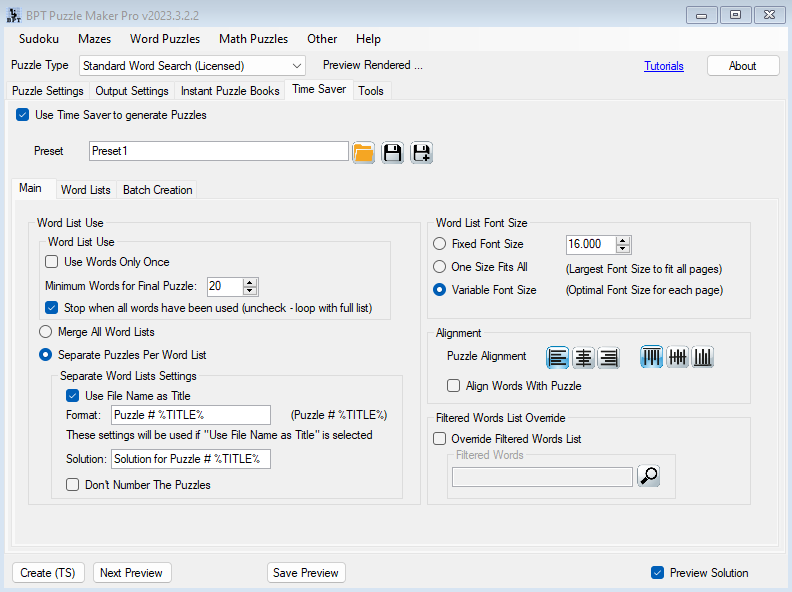
On the "Main" tab you can set some preferences:
- Merge All Word Lists - this will merge all your separate word list into one huge set of words. Use this if you have many themed word lists and want to mix them all up for the word search puzzles
- Separate Puzzles Per Word List - this will create puzzles for each word list. This will also allow you to use the titles of the word list files as puzzle titles.
Time Saver - Word List
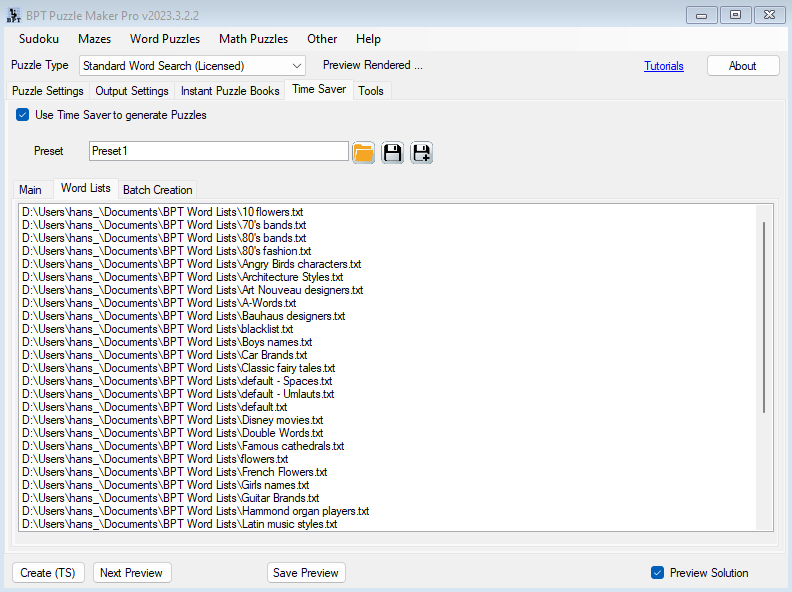
Select all your word files on the "Word Lists" tab. Each word list file should contain just the words, one on each line. No headings, no additional information. Just the words in plain text. Just be careful when you copy word lists from the internet, you may by accident copy additional characters that cannot be processed by Puzzle Maker Pro.
Time Saver - Puzzle Setup
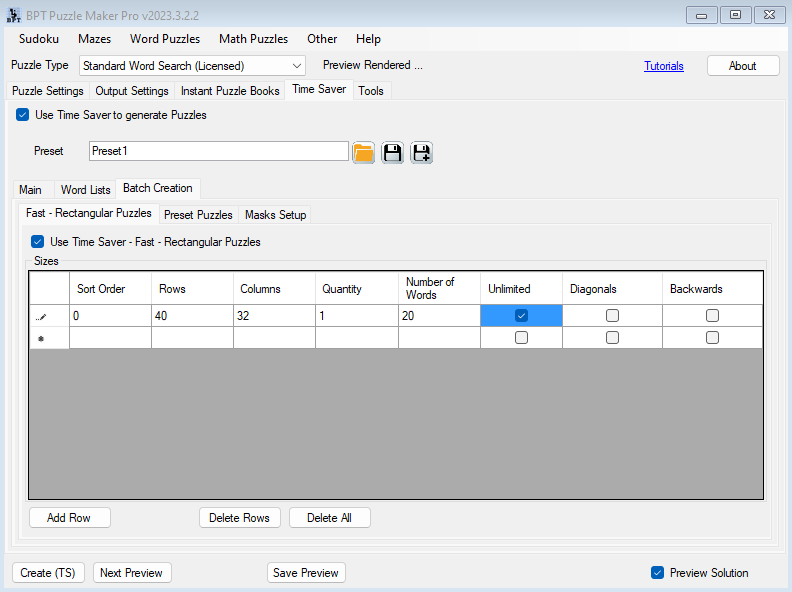
Finally the Puzzle Setup. Use the dimensions you calculated at the start of this tutorial (or the ones you just want to use). Optionally select the other options in each row. Just click on the cell (e.g. where it says 40 or 32 or 20 in the screenshot) to edit the number or switch an option on or off.
When you click "Create (TS)", Puzzle Maker Pro will generate puzzles and a puzzle book. (Don't forget to select Powerpoint and/or PDF on the Instant Puzzle Books -> Output Type tab).
The way Puzzle Maker Pro handles these settings:
For each word list, it will process the table with puzzle formats, and generate the quantity of puzzles you've set here.
- If you have 10 word lists, and just one puzzle format with quantity 10, you'll get 100 puzzles
- If you used "Merge All Word Lists", it counts as 1 single (large) word list. In that case you would get just 10 puzzles.
Creating the Puzzle Book - Manually
Another option to create a Word Search puzzle book (or any other type of puzzle) is to manually create puzzles that appeal to you visually. Puzzle Maker Pro will create a completely randomized new puzzle each time you click "Next Preview".
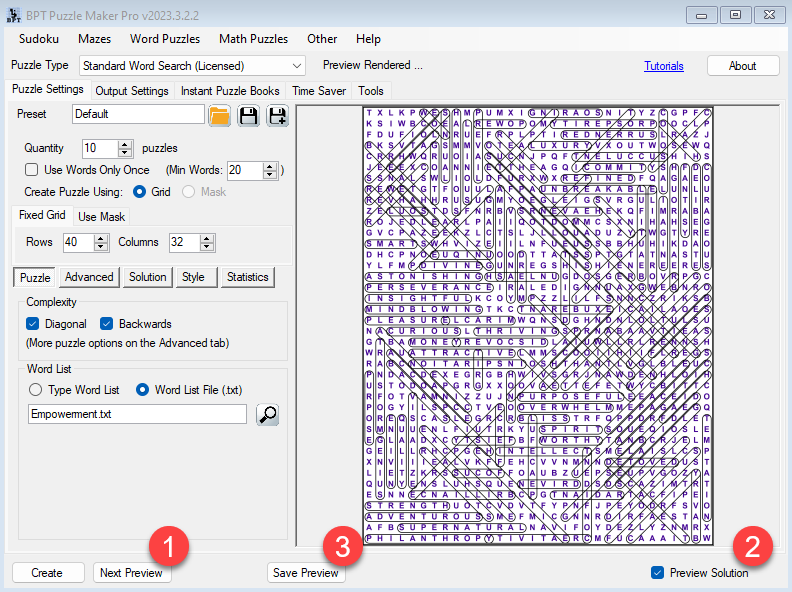
- Click "Next Preview" to generate a new puzzle
- Optionally switch between Puzzle and Solution Preview, by clicking the "Preview Solution" option
- Click "Save Preview", this will save the puzzle files in the project folder, exactly the same way it would be saved when you click "Create".
The next step would be to create the puzzle book from all the saved puzzles:
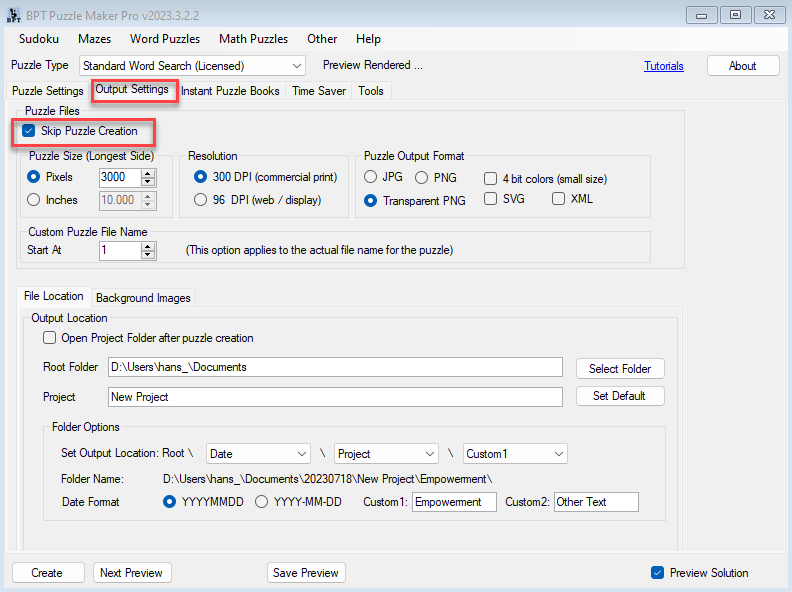
On the "Output Settings" tab you can find an option "Skip Puzzle Creation". When you switch this option on, and click "Create" (or "Create (TS)"), Puzzle Maker Pro will not generate new puzzles, but will only create the Powerpoint file or PDF from the existing puzzles in your project folder. (You have to make sure there are no additional puzzles or other files that you don't want to appear in the book).