How to use Puzzle Maker Pro - Mazes 2D DIY Mazes
How to use Puzzle Maker Pro - Mazes 2D DIY Mazes
This tutorial applies to Puzzle Maker Pro - Mazes 2D DIY Mazes.
The tutorial "How to use Mazes 2D Squares" describes how to use the generic options for Mazes 2D.
The tutorial for "Patchwork Log Cabin" describes the common features - this tutorial focuses on how to draw and create your own maze.
Mazes 2D DIY Mazes lets you design your own maze. Entirely, or as a building block that will be repeated and rotated to fill a larger grid.
This module includes:
- The option to use your own maze, by creating a text file that can be selected (imported) in Puzzle Maker Pro
- 3 colorization options (no colors plus two ways to add color accents, dependent on the your maze specifications)
- Several options to fill a larger grid (maze) with a smaller design. If you are using POD Graphics Maker as well, you'll recognize this. (this feature is described in detail in the tutorial for "Patchwork Log Cabin"
In addition to the log cabin options, this module includes the 'standard' maze generation and style options in the Puzzle Maker Pro - Mazes 2D collection.
Note: There is no Masks Add-On available for this module. However, you can build the mask into your DIY Maze by adjusting the pattern.
Using Mazes 2D DIY Mazes
Select Mazes 2D in the main Puzzle Type dropdown menu, then select DIY Mazes in the (maze) Type dropdown menu. Click "Next Preview" to quickly get a first impression. (Changing settings does not automatically create a new preview, because you may want to change multiple settings, and the mazes, especially at larger sizes, may take some time to generate).
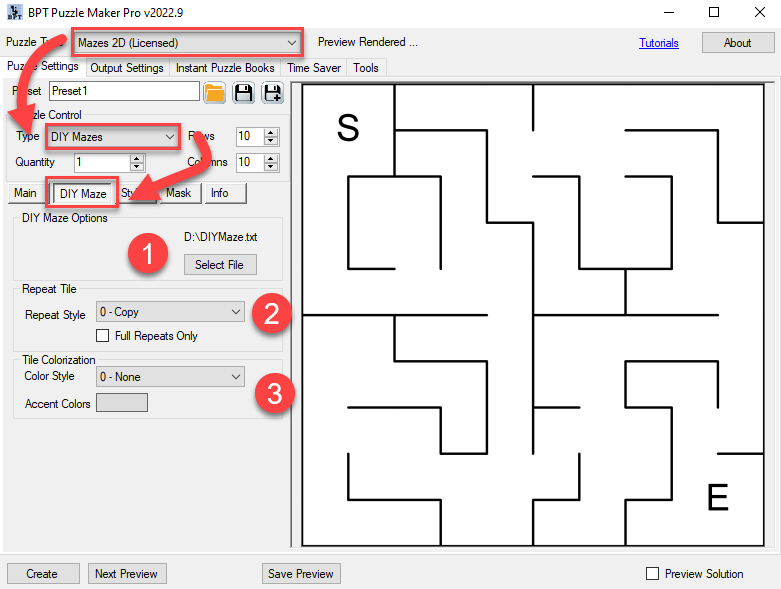
On the special DIY Maze tab, you can see several groups of settings:
- File selection
- Repeat settings
- Colorization settings
How to use the Repeat settings and colorization settings is described in the Patchwork Log Cabin tutorial. The way it looks will completely depend on your maze.
Creating the maze
There are 6 steps to create your maze
- Draw the maze
- Number the different cells / shapes in your maze
- Create a text file from these numbers
- Select the text file in Puzzle Maker Pro
- Click Preview
- Adjust maze settings
Step 1 - Draw the maze
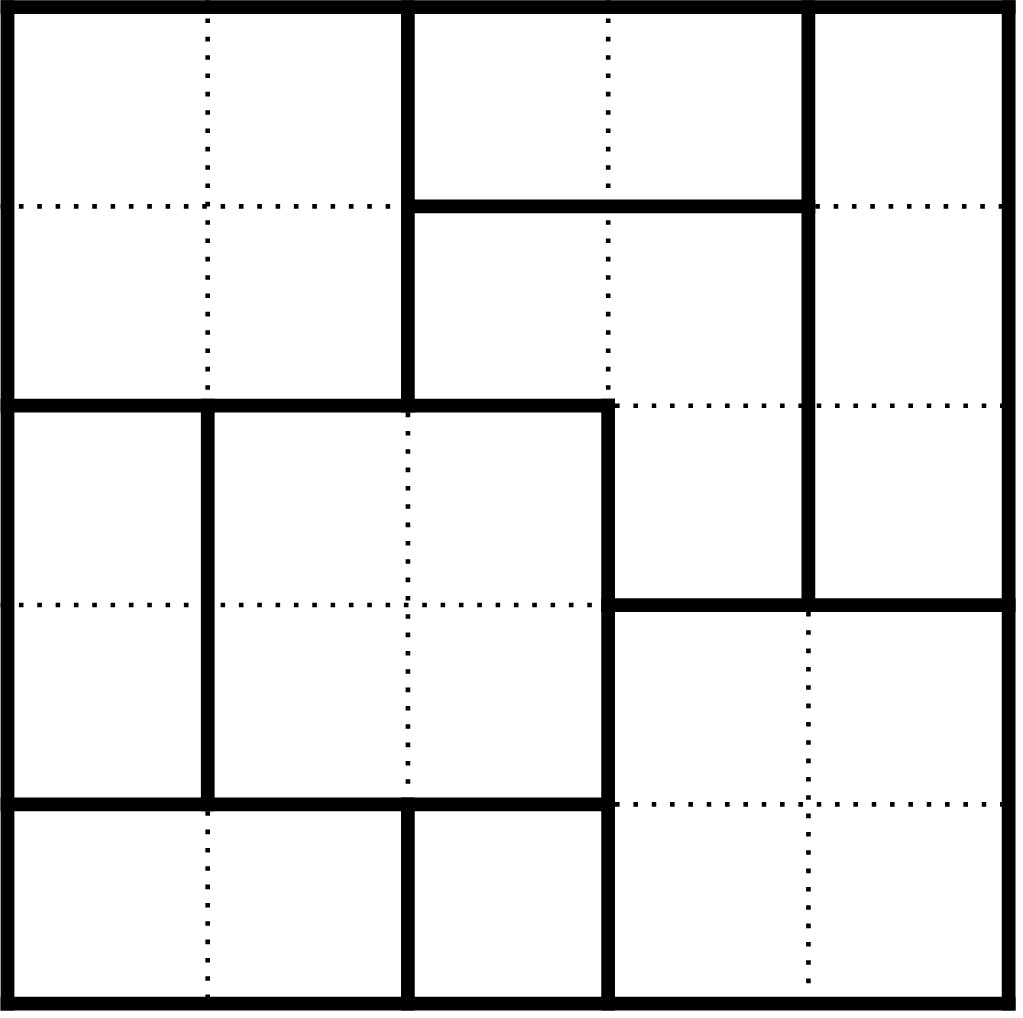
This example image was created in Powerpoint (using a 5x5 table), but you can draw with pencil and paper, or any way you like. The image with the different cells or shapes is just for you, it's not just by Puzzle Maker Pro.
The one thing you need to take care of, is that the grid is made out of squares, each row has the same number of squares, and each column has the same number of squares.
You obviously do not need to design the passages between the cells. These will be generated by Puzzle Maker Pro. if two shapes have multiple shared borders (such as shape 3 and 4 in the next image), Puzzle Maker Pro will randomly select one of the borders.
Each shape needs to be fully connected (in math terms: 4-connected). That means the squares in the shape should be next to each other vertically or horizontally. Otherwise no maze can be generated.
You can choose your own size, up to 100x100. However, in most cases you get create effects by using a smaller design, e.g. 5x5 to 10x10 squares, and then use the power of Puzzle Maker Pro to create randomized repeats.
Step 2 - Number the cells

You can use numbers or letters or words, to identify each shape in your maze design. The example uses consecutive numbers (this is the best way for quality control, to be sure there are no duplicate numbers in different shapes).
Step 3 - Create a text file
Now create a simple text file, that can be edited in Notepad. The software can NOT handle Word, Excel or Powerpoint files! just type the numbers for each row, separated by commas. Each row on a separate line, like this:
1,1,2,2,4
1,1,3,3,4
5,6,6,3,4
5,6,6,9,9
7,7,8,9,9
Here's a screenshot of the file DIYMaze.txt that I created for this tutorial:
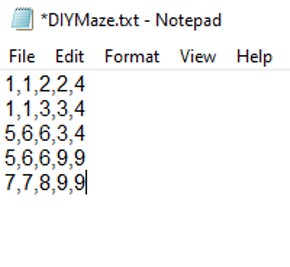
The commas will be used to separate the different cell/shape codes. You cannot use another symbol instead.
That's really all there's to it.
Step 4 - Select the text file
That's number (1) in the screenshot at the top of this page
Step 5 - Click Preview
You'll need to click "Next Preview" to see the results. This is done on purpose, because you may want to adjust several settings at once, and generating a custom maze can take a bit of time (a second or two, for very large mazes, depending on your computer)
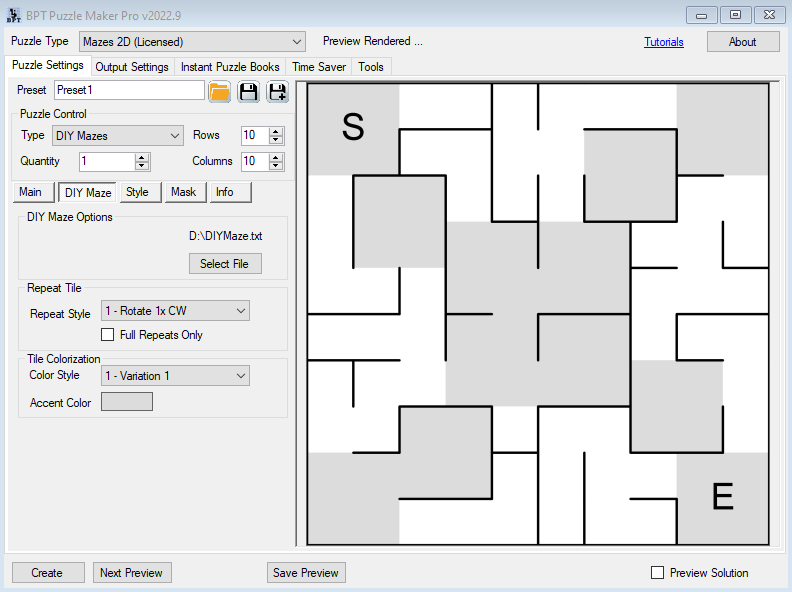
Step 6 - Adjust maze settings
Depending on your design, you can now change the grid size and the repeat options, to get differently looking randomized mazes from your design. However, you can also just use your designed maze as is (without repeating etc); Puzzle Maker Pro will generate a different maze each time.
Advanced design options
Excluding squares from the maze
There is no Masks option for DIY Mazes, but you can easily exclude cells from the maze: Just use a 0, or nothing at all to add a square that's excluded.
For example 1,1,0,2,2 - this is identical to 1,1,,2,2 (the first option is easier to read and to adjust visually).
Colorization
In addition to the numbers for your maze, you can add a separate (!) line starting with the word 'Accent1' or 'Accent2' that has the numbers that need to be colorized. The lettercase of the word Accent1 doesn't matter.
Accent1 will be used if you select Color Style 1, acccent2 will be used if you select Color Style 2.
1,1,2,2,4
1,1,3,3,4
5,6,6,3,4
5,6,6,9,9
7,7,8,9,9

accent1 1,6,9
This will use the specified accent color for shapes 1, 6 and 9. This can give you a result like the following screenshot:
Final remarks
Just like other Puzzle Maker Pro modules, it's best to play around with the settings, generate previews of the mazes, and find settings that fit your style. Don't forget to save these settings as presets, for later reuse!