How to use the Time Saver for Word Search (v2023.3.3 and newer)
This tutorial shows how to use the Time Saver for Word Search (v2023.3.3 and newer)
The tutorial applies to (both are required):
Introduction
With Puzzle Maker Pro version v2023.3.3, the Time Saver for Word Search has undergone significant changes. It now lets you combine multiple puzzle types in one single table (more about that later). This allows you to completely set up your puzzle book to look the way you want.
Using this Time Saver consists of 3 steps, before you click the "Create" button:
- Set up the 'global' options for the puzzles and puzzle book,
- Select the Word Lists you want to use in your puzzle book,
- Configure the puzzles you want to generate and include in your puzzle book.
A good way of learning to use this version of the Time Saver is to play around with the word lists and puzzle configuration first. You can easily create 'test' puzzle books in Powerpoint or PDF format, to see the results of certain options, and delete these files when you're done.
Set up the Global Options
First of all, you'll have to click the "Use Time Saver" checkbox at the top of the page to activate the Time Saver. The text for the "Create" button at the bottom will change into "Create (TS)".
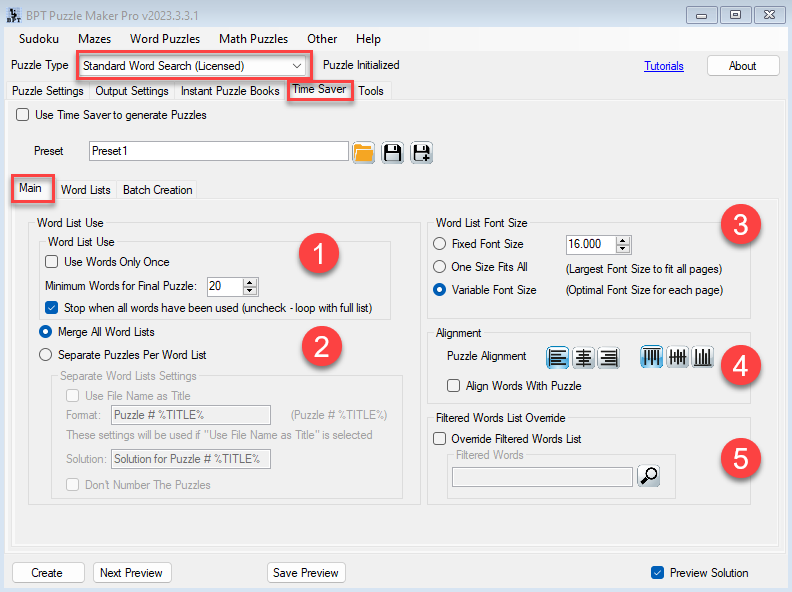
Word List Use Options
The "Word List Use" options will override the similar options for the Word Search Puzzle Settings tab.
- When you create several puzzles (for example, when you set quantity to 10), you can specify that words will only be used once (1). This means that you get a set of puzzles that don't use the same words. However, processing may stop when all words have been used.
- Minimum Words for Final Puzzle will make sure there are enough words in the last puzzle, or it will stop generating puzzles. For example, if you have a list of 100 words, and the first two puzzles together use 85 words, you will not get a third puzzle, because there are only 15 words left for the puzzle.
- "Stop when all words have been used" - In the previous example, you can order Time Saver to stop, so you get only 2 puzzles, or you can uncheck this options. In that case it will reset the word list and start over, with all words available for the next puzzle.
- "Merge All Word Lists" (2) - If you specify more than 1 word list on the "Word Lists" tab, you may want to merge them into one large word list for all your puzzle. This allows you, for example, to use a Christmas themed word list, and a general word list together, so each puzzle will have some themed words and some words from the general list.
Layout Options
-
Word List Font Size
- With the default 'Variable Font Size' you may get a different font size for the different word lists, depending on the length of the words and the number of words. It's a matter of style choice whether you like this.
- You can also set it to "One Size Fits All". That will analyze all the word lists to find the largest font size that allows all the word lists to be printed in the available space.
- With "Fixed Font Size" you can explicitly specify the font size. With this option it makes sense to generate a test version of your book and check this manually: If you set the Font Size too large, some words may not be printed due to the available space the word lists.
-
Alignment - you can set the alignment of the puzzles in the available space. For example if you have one puzzle per page, with a trim size of 8.5" and 0.5" margins, that would leave 7.5" for the puzzle. Usually the height will then only be 4 or 5" (since the title and word list require some space as well), a square puzzle would be printed at a 5x5" size. You can set whether it should be aligned left, center or right. Additionally, you can 'force' Puzzle Maker Pro to align the word lists with the puzzle, to make the page look more compact.
-
In some cases, for example religious puzzle books, you may want to add a "Filtered Words" List. This is a list of words that should not appear in the puzzle by accident. (Please note: this will NOT filter words from the regular words list. If you use the word "homeowner" in a word list, and the word "meow" is in your filtered word list, the word "homeowner" can still appear in the puzzle!
Separate Word Lists
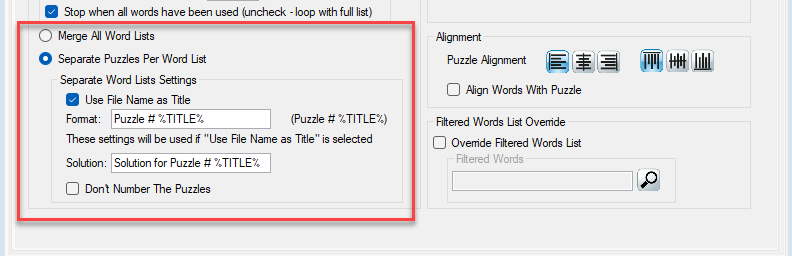
You can also choose to keep all word lists separate. In that case you can even use the word list file name as a title for the puzzle.
For example, if you have a word list "dinosaurs.txt", it can use the word "dinosaurs" as a title. When it results in several puzzles (e.g. quantity is set to 2 or higher), the puzzles will be numbered dinosaurs 1 and dinosaurs 2.
You can set up your own title format:
- "Puzzle" is printed as is. You can type a different word here, or leave it out. For example for other languages you can change this.
- "#" is the puzzle number. All puzzles in your book are numbered, unless you click "Don't Number the Puzzles".
- %TITLE% is a placeholder that will be replaced with the name of the word file. The way this is set up in the screenshot could result in a puzzle title like "Puzzle 113 dinosaurs".
Select the Word Lists

On the next tab you can select your word lists. Each file should be a plain text file with ONLY the words you want to use, each word on a separate line. Each line will be considered a separate word for the puzzles.
An example:
Cars.txt
-------
BMW
Mercedes
Alfa Romeo
Aston Martin
Ford
Toyota
BYD
Ferrari
Ford E-150
Honda CR-X
Configure the Puzzles
To specify which puzzles you want to generate and print in your puzzle book, go to the "Batch Creation" tab. Please don't let the numbers and arrows in the screenshot below overwhelm you.
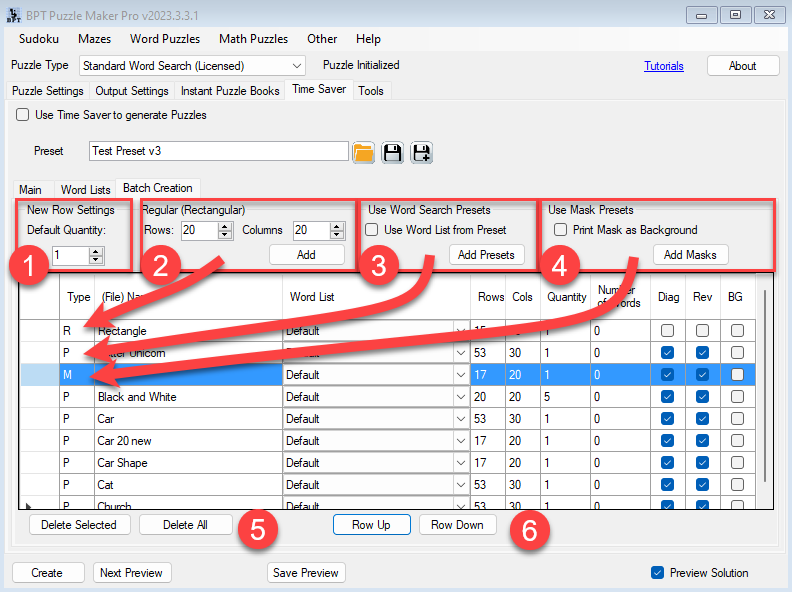
What you see here is a table that contains a row for each puzzle configuration that you want to create. Regular puzzles with just the number of rows and columns, Preset puzzles from your own Word Search presets, and Mask puzzles, from your own saved masks.
At the top left, you can set the Default Quantity (1) for each row you add. By default it's set to 1. You can also edit the configuration for each row later on, just by clicking on the cell you want to change.
You can move rows up and down by selecting a single row and clicking the "Row Up" or "Row Down" buttons.
You can delete rows from the table by selecting one or more rows and clicking the "Delete Selected" button, or clicking the "Delete All" button. Deleting rows from this table will NOT delete presets or saved masks.
Adding Regular Word Search Puzzles (2)
The easiest way to add puzzles, which was called 'Fast' in the older Time Saver, is by setting the number of rows and columns. In box (2) you can see that both the Rows and Columns are set to 20. When you click the button "Add", it will add a row to the table:
- Type: R (Regular), this identifies the type of puzzle for that row
- (File) Name "Rectangle". This has no further meaning for Regular puzzles
- Word List "Default". See "Word List Setup for Specific Puzzles" below for details.
- Rows / Cols: The number of rows and columns for the word search puzzle
- Quantity: The number of puzzles to generate
- Number of Words: The number of words for the puzzle. A value of 0 (zero) means unlimited, as many as can be fit in
- Diag: Allow Diagonals for the puzzle
- Rev: Allow Reversed (Backwards printed) words for the puzzle
- BG: Not relevant for Regular puzzles
Adding Word Search Puzzle Presets (3)
To use your existing Word Search Puzzle Presets to the list, click "Add Presets". This will open a window where you can select all the presets you want to add. The information in the table that's specific for Preset rows:
- Type: "P" for Preset
- (File) Name: The name of the preset
- Word List: See "Word List Setup for Specific Puzzles" below for details.
Adding Word Search Saved Masks (4)
To use your existing Saved Masks to create puzzles, click "Add Masks". This will open a window where you can select all the masks you want to add. These are mask that are saved from the Mask Editor that's shown when you click "set Mask" in the Puzzle Settings tab for Word Search puzzles. The information in the table that's specific for Mask rows:
- Type: "M" for Mask
- (File) Name: The name of the saved masks file
- BG: Print the mask silhouette as a background for the puzzle. You can switch this on and off for each row of type Mask. Additionally, since you probably want to have a consistent approach to printing mask, you can set the default value for this option in box (4): Print Mask as Background
Word list Setup for Specific Puzzles
The "Word List" column in the table gets the value "Default" for each new row. There are some other options.
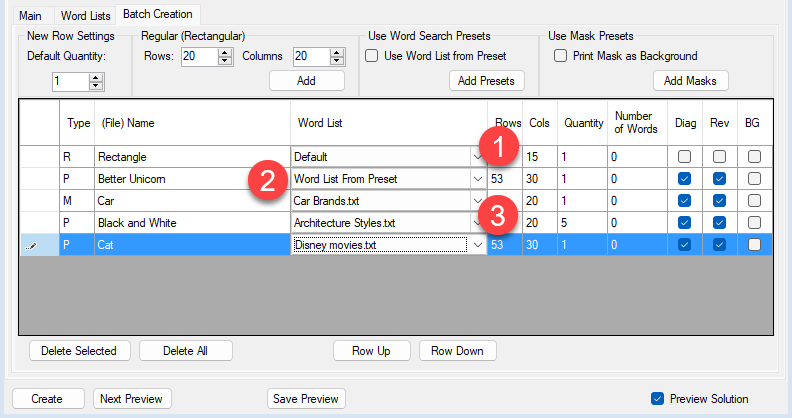
To change the Word List value for any of the rows in the table, click the down arrow (the 'v' next to Default) to get a list of options.
- Default: This will use the default word list setup as defined on the "Main" tab. For each row the word lists will be reinitialized
- Merge All Word Lists: For each row in this table, whether the quantity is 1 or more, the 'merged' word list is initialized and used. That means that the same word can be used for puzzles from several rows. (The option "Use Words Only Once" applies only to the quantity of puzzles for a single row)
- Separate Puzzles Per Word List: For each row in the table, the next word list will be used. For example, the first row with "Default" will use word list 1, the second will use word list 2, etc. When there are no more word lists, it will start back at word list 1.
- Word List From Preset: This will work only for rows with the "Preset" type! It will use the word list that was saved with the puzzle preset. This can be a pasted list of words, or a word list file. (If you use this setting for the other rows in the table, it will revert to "Default" when processing the table
- A specific Word List file: You can also select any of the word list files that you added to the "Word Lists" tab. You'll need to set up all the word lists you want to use on the "Word Lists" tab, because Puzzle Maker Pro won't know in which folders you store all your word lists. When you select a specific file, such as "Car Brands.txt" in the screenshot, only that file will be used for the puzzle.
Tips and Tricks
- The previous version of the Time Saver would 'multiply' the number of word lists with the quantities set in the table. This (new) version will generate exactly the quantities that are set in the table, unless your word lists do not contain enough words.
- Setting up Masks or Word Search Presets is a time investment that will pay off. You can choose to either set up a Word Search Preset with a Mask and a Word List, or to just create the Mask and Word List and combine them in the table in the Time Saver. The result will be identical
- If you have a Preset with a mask, and you change the number of rows and columns in the table, the mask will not be used. Example: If you have a mask of a cat that has 23 rows and 17 columns, and you change the numbers to 25 rows and 20 columns, the mask will not fit with those dimensions and will not be used
- You'll need to add ALL the word lists you want to use, on the "Word Lists" tab. These will be added automatically to the drop down menu for the Word List column
- You can add a list of Presets and then add a list of Masks, and use the Row Up / Row Down button to mix them up, if needed. You can also maximize the Puzzle Maker Pro window on your computer to see more of the table.